1B) Explain and evaluate each of the animation technique:
1)
Zoetrope:
This is a simple 2D looped animation of multiple birds flying in a simultaneous straight line.
(https://www.youtube.com/watch?v=-3yarT_h2ws)
A Zoetrope is a device used to make multiple pictures to produce the illusion as though they are moving. The zoetrope consists of these parts:
Animation Reel- These are strips of paper are used to draw the pictures for the animation on. The picture is drawn frame by frame along the strip until the pictures reach the end. once this is completed the strip of paper is the folded into a circle shape and placed into the zoetrope, along the zoetrope walls.
Zoetrope holes- These wholes split each individual picture, splitting apart the gaps between the pictures so that once the zoetrope has been span, it gives the illusion that the image is moving.
Zoetrope wall- Within the inner areas of the zoetrope, The animation reel is placed against the zoetrope wall in order to keep it in place whilst its being span.
In conclusion the zoetrope is a circular shaped device that is span in mainly a clockwise direction to give off the illusion that the photo within its walls have come alive.
2) Kinetoscope:
In this video of the kinetoscope in use, there is are multiple examples and different film scenarios of to present essentially how the kinetoscope would look
(https://www.youtube.com/watch?v=WmZ4VPmhAkw)
A Kinetoscope is a device that allows one individual at a time to watch motion pictures through an eyepiece. this device was created by Thomas Edisson and first shown to the public in 1894.
This is a device uses is an eye piece at the top of it to allow an individual viewer to watch a sequence of images creating the illusion of movement by coveying a strip of perforated film bearing sequential images over a light soarce with a high speed shutter. Later on Thomas Edison designed what he called the phonograph to provide sound for these visual images displayed on the Kinetograph.
3) Flipbook:
In this example of flipbook animation. There is fight between two iconic characters, Dragon ball Z's Goku and American super-hero Superman. The fight is a strenuous task for both of these icons as both of them seem to be just as powerful and skillful as each other. However only one of them comes out from this fight alive.
(https://www.youtube.com/watch?v=oSarcflsQQM)
Flipbook animation shares similarities with the technique used by the Zoetrope, as the illsuion of moving images is created by the fast movement of drawing past the viewers eyes. But unlike the Zoetrope, Flipbook creates the illusion by the movement of each character drawn on each page. The fast paste turning of pages then creates an illusion to make it seem as though the drawing has come to life. Sound for this type of animation are usually added in by the use of editing software.
4)
Cel animation
In this example of cel animation, there is a simple animation of a ninja running in one direction. This animation used 18 cels (as the video claims) and loop them over to give off the effect as though the ninja is running in one constant direction:
(https://www.youtube.com/watch?v=abVlaZxV6tw)
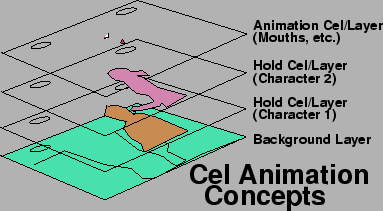
Cel animation was commonly used for most major animation films before the 1990s, as it was replaced with CAPS animation (Computer animation production system). Cel animation is executed by the use of transparent sheets of cellulose acetate, which are also known as cels.These cels contain hand-drawn or preferably painted characters, which is then placed over a static background. The backgrounds of the animations are normally painted by who is specialized in that specific task, because the background is much larger and is seen for a higher period of time than the animated characters are. To animate the characters and give off the illusion that they are moving; the designers use a key-frame technique, in which they complete rough sketches of the actions they want their character to commit. Once they are perfected the artist then cleans up the line work and begins whats called a pencil test. This test is done to ensure that all the movements flow together correctly. Finally, the character and the background art is combined to create an animation.
5) Rotoscoping
The following video not only demonstrates rotoscope animation, but also gives the audience a glimpse of the 4 stages the animator went through to design the character. The Rotoscope demonstration is of a skateboarder skating around performing various tricks on his skateboard which is all being projected onto a piece of paper.
(https://www.youtube.com/watch?v=IimLnyOeCtY)
Rotoscoping is the rotated projection of sequences that are usually photographed action image frames. This is so that the artist can trace from the frame or create an image to superimpose on it. Rotoscoping is commonly thought of as "Painting on movies". Rotoscope animation can also be digitally composed. This is done by using photo editing programs, photoshop is more commonly used for projects like this. Essentially the tools in the editing program, like the brush are used to edit each frame of the video, concluding in an animated piece.
6) Draw on film
The following footage is a college exercise that demonstrates draw on film animation. This demonstration consists of different animated shapes, figures and words for an example of some of the creative things you can create using drawn on film animation.
(https://www.youtube.com/watch?v=FNb6QuvF6cE)
There are three methods of developing a draw on film production. One of the methods that is used to produce draw on film animation is using blank film stock to start your animation. Another method of using draw on film animation is by starting with black undeveloped film. However the black developed tape must be scratched or edged into, in order for it to be usable for this type of animation. This is because each of the frames need to be exposed. Essentially, the second method converts the film into the same state as the first method. The third method takes place within a dark room, using unexposed film that is exposed frame by frame. The artist then place different objects onto a fresh stock, using a small light beam to begin creating the images. However, this third method of creating draw on film animation has to be sent to a lab and processed just as if it was filmed on camera.
7) Digital Application
In the following video it presents a showreel of different test animations using digital computer applications such as 3DS Max and Adobe After Effects CS6. The video also showcases to the audience the different stages of its art and how the physics within the animation work. The video allows the viewer to see a variety of different projects to present the flexibility and beautiful and creative visualty that can be made within these programs.
(https://www.youtube.com/watch?v=mDL8KWCnPpE)
Digital Application animation is essentially the use of computer editing programs to create digital art. These animations that are produced out of digital art are known mainly known as CGI (Computer generated imagery) There are mainly different applications that can be used to create these animations however the most common ones are called:
- Cinema 4D
- 3DS max
- Adobe After Effects
- Autodesk Maya
8)
Claymation
In this animation the animator tries to re-create his own version of one of the most popular fight scenes from the movie "The Matrix Reloaded" It consists of multiple clones of the same piece of clay representing the agents from the movie and a clay with an anomalous colour that represents the main character (Neo) from the matrix movie. This animation is a clear example of what is achievable when spending a lot of time creating a movie using the technique of claymation.
(https://www.youtube.com/watch?v=9dWU9jPCjkM&spfreload=1)
Claymation is very similar to stop motion. Claymation uses the same technique to capture the footage (by taking pictures of the movement of your subject, following it frame by frame) and creating the illsuion as though the subjects of your animation are organismic stimuli. However, the subjects you use to create these illusions are purely based off of clay. Moreover, sound effects and speech for the animation can be implemented into it, from the use of different editing software's.


